
1. Axios
(1)Axios란?
공식문서에서는 axios를 node.js와 브라우저를 위한 Promise 기반 http 클라이언트라고 소개하고 있다.
다시 말해 http를 이용해서 서버와 통신하기 위해 사용하는 패키지라고 생각하면 된다.
(2)Axios 설치하기
CRA를 통해서 새로운 프로젝트를 생성하고, 터미널에 아래의 명령어를 입력해서 axios를 설치한다.
yarn add axios
2. json-server 설정
(1) 테스트용 db.json 설정
{
  "todos": [
    {
      "id": "1",
      "title": "react"
    }
  ]
}
3. GET
(1) Axios get
get은 서버의 데이터를 조회할 때 사용한다. 기본적인 사용방법은 아래와 같다.
// url에는 서버의 url이 들어가고, config에는 기타 여러가지 설정을 추가할 수 있습니다.
// config는 axios 공식문서에서 확인하세요.

axios.get(url[, config]) // GET
공식문서 소개 링크
https://axios-http.com/kr/docs/req_config
요청 Config | Axios Docs
요청 Config 다음은 요청을 만드는 데 사용할 수 있는 config 옵션들 입니다. 오직 url만 필수입니다. method를 지정하지 않으면 GET방식이 기본값 입니다. { url: '/user', method: 'get', baseURL: 'https://some-domain.
axios-http.com
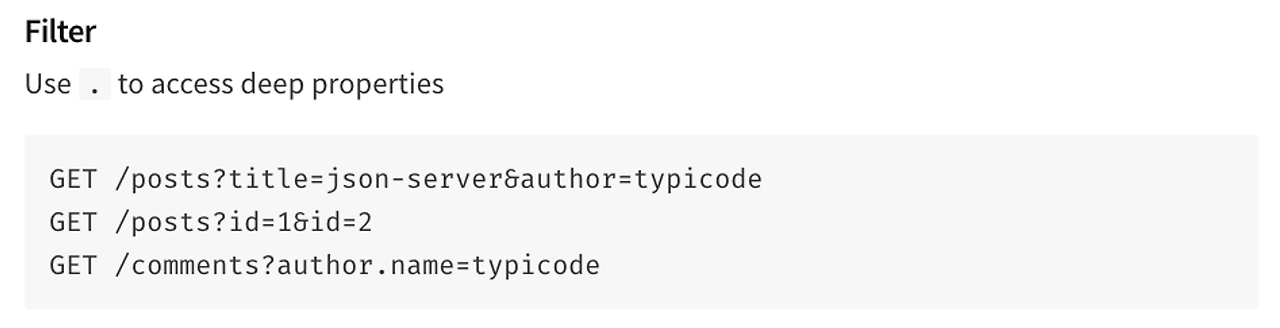
(2) json-server API 명세서 확인하기
전체 정보나 상세 저옵는 아래와 같이 path variable로 url을 작성하면 된다.

filter와 같은 기능을 위해서 GET 요청을 하고자 할 때는 query로 보내라고 명시하고 있다.
(3)코드로 알아보기
// src/App.js

import React, { useEffect, useState } from "react";
import axios from "axios"; // axios import 합니다.

const App = () => {
  const [todos, setTodos] = useState(null);

	// axios를 통해서 get 요청을 하는 함수를 생성합니다.
	// 비동기처리를 해야하므로 async/await 구문을 통해서 처리합니다.
  const fetchTodos = async () => {
    const { data } = await axios.get("http://localhost:3001/todos");
    setTodos(data); // 서버로부터 fetching한 데이터를 useState의 state로 set 합니다.
  };

	// 생성한 함수를 컴포넌트가 mount 됐을 떄 실행하기 위해 useEffect를 사용합니다.
  useEffect(() => {
		// effect 구문에 생성한 함수를 넣어 실행합니다.
    fetchTodos();
  }, []);

	// data fetching이 정상적으로 되었는지 콘솔을 통해 확인합니다.
  console.log(todos); // App.js:16
  return <div>App</div>;
};

export default App;
4. POST
(1) Axios Post
axios.post(url[, data[, config]]) // POST
post는 보통 서버에 데이터를 추가할 때 사용한다.
(2) 코드로 알아보기
// src/App.jsx

import React, { useEffect, useState } from "react";
import axios from "axios"; // axios import 합니다.

const App = () => {
  // 새롭게 생성하는 todo를 관리하는 state
  const [todo, setTodo] = useState({
    title: "",
  });

  const [todos, setTodos] = useState(null);

  const fetchTodos = async () => {
    const { data } = await axios.get("http://localhost:3001/todos");
    setTodos(data);
  };

  const onSubmitHandler = async(todo) => {
	//1.  이때 todos는 [{투두하나}]임
    await axios.post("http://localhost:3001/todos", todo); // 이때 서버에 있는 todos도 [{투두하나}]임

	// 근데 여기서 서버 요청이 끝나고 서버는 [{투두가},{두개임}]
	setTodos([...todos, todo]) 2. <-- 만약 이게 없다면, go to useEffect
	//4. 새로고침해서 진짜 현재 서버 데이터를 받아오기전에 상태를 똑같이 동기시켜줌
	//5. 어떻게보면 유저한테 서버에서 새로 받아온것처럼 속이는 것

  };

  useEffect(() => {
    fetchTodos(); //3. 새로고침해서 여기를 다시 실행해줘야 서버값이 새로 들어옴 e.g) [{투두가},{두개임}]
  }, []);

  return (
    <>
      <form
        onSubmit={(e) => {
					// 👇 submit했을 때 브라우저의 새로고침을 방지합니다.
          e.preventDefault();
          onSubmitHandler(todo);
        }}
      >
        <input
          type="text"
          onChange={(ev) => {
            const { value } = ev.target;
            setTodo({
              ...todo,
              title: value,
            });
          }}
        />
        <button>추가하기</button>
      </form>
      <div>
        {todos?.map((todo) => (
          <div key={todo.id}>{todo.title}</div>
        ))}
      </div>
    </>
  );
};

export default App;
5. DELETE
(1) Axios delete
DELETE는 저장되어 있는 데이터를 삭제하고자 요청을 보낼 때 사용한다.
axios.delete(url[, config]) // DELETE
(2) 코드로 알아보기
// src/App.jsx

import React, { useEffect, useState } from "react";
import axios from "axios";

const App = () => {
  const [todo, setTodo] = useState({
    title: "",
  });

  const [todos, setTodos] = useState(null);

  const fetchTodos = async () => {
    const { data } = await axios.get("http://localhost:3001/todos");
    setTodos(data);
  };

  const onSubmitHandler = (todo) => {
    axios.post("http://localhost:3001/todos", todo);
  };

	// 새롭게 추가한 삭제 버튼 이벤트 핸들러
  const onClickDeleteButtonHandler = (todoId) => {
    axios.delete(`http://localhost:3001/todos/${todoId}`);
  };

  useEffect(() => {
    fetchTodos();
  }, []);

  return (
    <>
      <form
        onSubmit={(e) => {
          e.preventDefault();
          onSubmitHandler(todo);
        }}
      >
        <input
          type="text"
          onChange={(ev) => {
            const { value } = ev.target;
            setTodo({
              ...todo,
              title: value,
            });
          }}
        />
        <button>추가하기</button>
      </form>
      <div>
        {todos?.map((todo) => (
          <div key={todo.id}>
            {todo.title}
            {/*  디자인이 요상하긴 하지만..! 삭제 버튼 추가 */}
            <button
              type="button"
              onClick={() => onClickDeleteButtonHandler(todo.id)}
            >
              삭제하기
            </button>
          </div>
        ))}
      </div>
    </>
  );
};

export default App;
6.PATCH
(1) Axios patch
patch는 보통 어떤 데이터를 수정하고자 서버에 요청을 사용할 때 보내는 메서드이다.
axios.patch(url[, data[, config]]) // PATCH
(2) 코드로 알아보기
mport React, { useEffect, useState } from "react";
import axios from "axios";

const App = () => {
  const [todo, setTodo] = useState({
    title: "",
  });
  const [todos, setTodos] = useState(null);

  // patch에서 사용할 id, 수정값의 state를 추가
  const [targetId, setTargetId] = useState(null);
  const [editTodo, setEditTodo] = useState({
    title: "",
  });

  const fetchTodos = async () => {
    const { data } = await axios.get("http://localhost:3001/todos");
    setTodos(data);
  };

  const onSubmitHandler = (todo) => {
    axios.post("http://localhost:3001/todos", todo);
  };

  const onClickDeleteButtonHandler = (todoId) => {
    axios.delete(`http://localhost:3001/todos/${todoId}`);
  };

  // 수정버튼 이벤트 핸들러 추가 👇
  const onClickEditButtonHandler = (todoId, edit) => {
    axios.patch(`http://localhost:3001/todos/${todoId}`, edit);
  };

  useEffect(() => {
    fetchTodos();
  }, []);

  return (
    <>
      <form
        onSubmit={(e) => {
          e.preventDefault();
          onSubmitHandler(todo);
        }}
      >
        {/* 👇 수정기능에 필요한 id, 수정값 input2개와 수정하기 버튼을 추가 */}
        <div>
          <input
            type="text"
            placeholder="수정하고싶은 Todo ID"
            onChange={(ev) => {
              setTargetId(ev.target.value);
            }}
          />
          <input
            type="text"
            placeholder="수정값 입력"
            onChange={(ev) => {
              setEditTodo({
                ...editTodo,
                title: ev.target.value,
              });
            }}
          />
          <button
						// type='button' 을 추가해야 form의 영향에서 벗어남
            type="button"
            onClick={() => onClickEditButtonHandler(targetId, editTodo)}
          >
            수정하기
          </button>
        </div>
        <input
          type="text"
          onChange={(ev) => {
            const { value } = ev.target;
            setTodo({
              ...todo,
              title: value,
            });
          }}
        />
        <button>추가하기</button>
      </form>
      <div>
        {todos?.map((todo) => (
          <div key={todo.id}>
						{/* todo의 아이디를 화면에 표시 */}
            {todo.id} :{todo.title}
            <button
              type="button"
              onClick={() => onClickDeleteButtonHandler(todo.id)}
            >
              삭제하기
            </button>
          </div>
        ))}
      </div>
    </>
  );
};

export default App;
7. Fetch
(1) 개념
Fetch는 ES6부터 도입된 Javascript 내장 라이브러리이다.
Promise 기반 비동기 통신 라이브러리이다.
axios처럼 데이터를 다루기 쉽고, 내장 라이브러리이기 때문에 별도의 설치 및 import를 필요로 하지 않는다.
(2)단점
미지원 브라우저 존재
개발자에게 불친절한 response
axios에 비해 부족한 기능
(3) fetch와 axios의 차이
CASE1. 데이터 읽어오기
1. fetch
const url = "https://jsonplaceholder.typicode.com/todos";

fetch(url)
.then((response) => response.json())
.then(console.log);fetch().then을 한 상태여도 여전히 JSON 포맷의 응답이 아니기 때문에 response.json()을 한번 더 해주는 과정이 필요하다.
따라서, fetch로 데이터를 요청하는 경우 두 개의 .then()이 필요하다.
2. axios
const url = "https://jsonplaceholder.typicode.com/todos";
axios.get(url).then((response) => console.log(response.data));
응답(reponse)를 기본적으로 JSON 포맷으로 제공한다.
CASE2. 에러 처리
1. fetch
const url = "https://jsonplaceholder.typicode.com/todos";

fetch(url)
  .then((response) => {
    if (!response.ok) {
      throw new Error(
        `This is an HTTP error: The status is ${response.status}`
      );
    }
    return response.json();
  })
  .then(console.log)
  .catch((err) => {
    console.log(err.message);
});catch()가 발생하는 경우는 오직 네트워크 장애 케이스이다. 따라서 개발자가 then() 안의 모든 케이스에 대한 HTTP 에러 처리를 해야 한다.
2. axios
const url = "https://jsonplaceholder.typicode.com/todos";

// axios 요청 로직
axios
  .get(url)
  .then((response) => console.log(response.data))
	.catch((err) => {

		// 오류 객체 내의 response가 존재한다 = 서버가 오류 응답을 주었다
		if (err.response) {

	    const { status, config } = err.response;

			// 없는 페이지
	    if (status === 404) {
	      console.log(`${config.url} not found`);
	    }

			// 서버 오류
	    if (status === 500) {
	      console.log("Server error");
	    }

		// 요청이 이루어졌으나 서버에서 응답이 없었을 경우
	  } else if (err.request) {
	    console.log("Error", err.message);
		// 그 외 다른 에러
	  } else {
	    console.log("Error", err.message);
	  }
});- axios.get()요청이 반환하는 Promise 객체가 갖고 있는 상태코드가 2xx의 범위를 넘어가면 거부(reject)한다.
- 따라서, 곧바로 catch() 부분을 통해 error handling이 가능하다.
'웹개발' 카테고리의 다른 글
| 서버사이드 렌더링 vs 클라이언트 사이드 렌더링 (0) | 2024.03.08 |
|---|---|
| [ts] 컴파일러와 tsc (0) | 2024.03.04 |
| [웹개발] 웹통신, HTTP란? (0) | 2024.02.20 |